
SAML Single Sign-On
This page explains how the single sign-on using SAML feature is set up for technical users.
Note: this feature is not part of the default Open Social product (basic/distro) but can be ordered as an extension module.
Technical Background
Open Social uses the SimpleSAMLphp library which uses the SAML 2.0 protocol for Single Sign-On. Open Social acts in this set-up as a Service Provider.
Configuring Single Sign-On
This feature can be configured on your platform at /admin/config/people/simplesamlphp_auth/os_saml_settings which can also be reached through the menu: Configuration > Open Social settings > Single Sign-On settings.
This screen allows you to enable and disable SAML based authentication. It also provides an overview of information about Open Social as Service Provider and configuration of the attribute mapping for attributes from the Identity Provider.
Configuring your Identity Provider
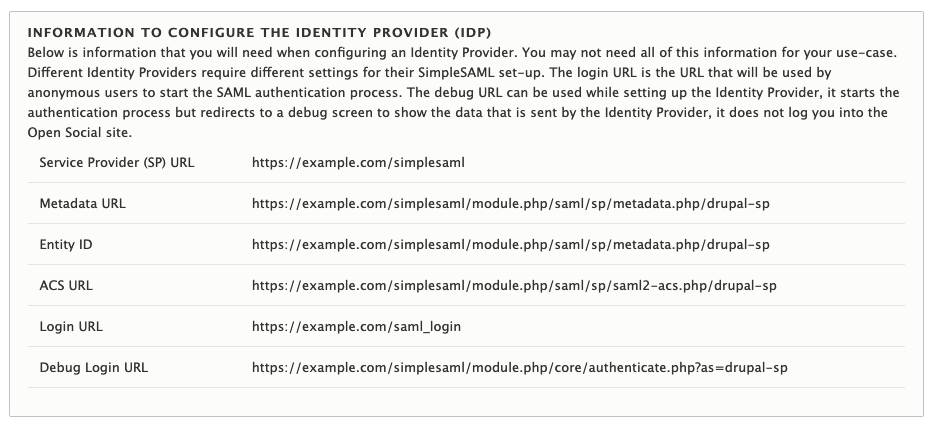
Your Identity Provider will need to know how to talk to Open Social (the Service Provider). What information you need depends on what service you're using as Identity Provider. The main settings screen lists the most common information. An example is provided in the image below.
Configuring the attributes received by Open Social
In order to authenticate a user, Open Social expects three attributes to be sent. The names of these attributes can be configured on the main configuration page. By default the same attribute is used as the unique identifier and username.
- SAML Link Identifier (default: eduPersonPrincipalName)
- This will be used to link Open Social users to users in the Identity Provider
- This should remain constant through the lifetime of a user account. If the value for a user changes they may lose access to their Open Social account.
- Username (default: eduPersonPrincipalName)
- This will be used as username in Open Social. A username is used as fallback display name when no name has been filled in on the user's Open Social profile.
- This must contain alphanumeric characters. Several special characters are allowed, including space, period (.), hyphen (-), apostrophe ('), and underscore (_). Note: this means an e-mail address is not a valid Open Social username.
- E-mail (default: mail)
- The user's email address that be used to deliver notifications to the user so it must be reachable from public mail servers.
By default the username and e-mail of a user are updated each time a user logs in but this behaviour can be disabled by unchecking "Synchronize ... on every login"
Adding the Identity Provider to Open Social
Your Open Social installation will need to be made aware of the Identity Provider that you've set-up. Identity Providers can be managed from the "Identity Providers" tab that is accessible from the main Open Social SAML settings page.
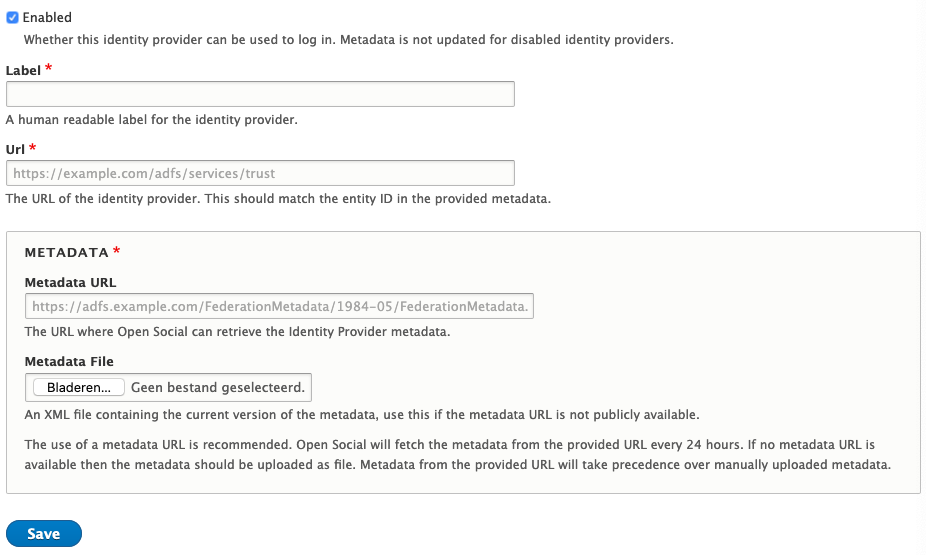
When adding an Identity Provider you will require the following information::
- The URL of the Identity Provider (IdP)
This is sometimes known as the Federation Service Identifier and for ADFS servers is in the form of <domain>/adfs/services/trust - The remote IdP metadata
This should be in XML format and can also be a URL that points to the XML download.
Open Social supports automatically fetching metadata from a metadata URL. Alternatively if the metadata URL is not available or remotely accessible, the metadata can be uploaded manually.
Post-set-up
Once the SAML extension has been enabled by the Open Social team and you've configured it as needed, your platform will be ready to use Single Sign-On as the login method on the platform.
The default login URL will change from /user/login to /saml_login which will change the Single-Sign-On procedure for a user. The default login button on the platform will also be changed to use this route. Manually created buttons, will need to be updated by a site manager. Site and Content managers who already had an account will still be able to sign in to Open Social with their existing account by visiting /user/login manually.
Note: the /saml_login route is not reachable for already authenticated users.
Configuring ADFS for use with Open Social SimpleSAML
The Open Social SAML setup requires some specific claims that may be slightly different from other configurations of your ADFS service. Below are the steps to configure the attributes as described in the set-up section.
The instructions below assume that you have already created a new Relying Party for Open Social. The information needed to configure a Relying Party is provided at the start of this article.
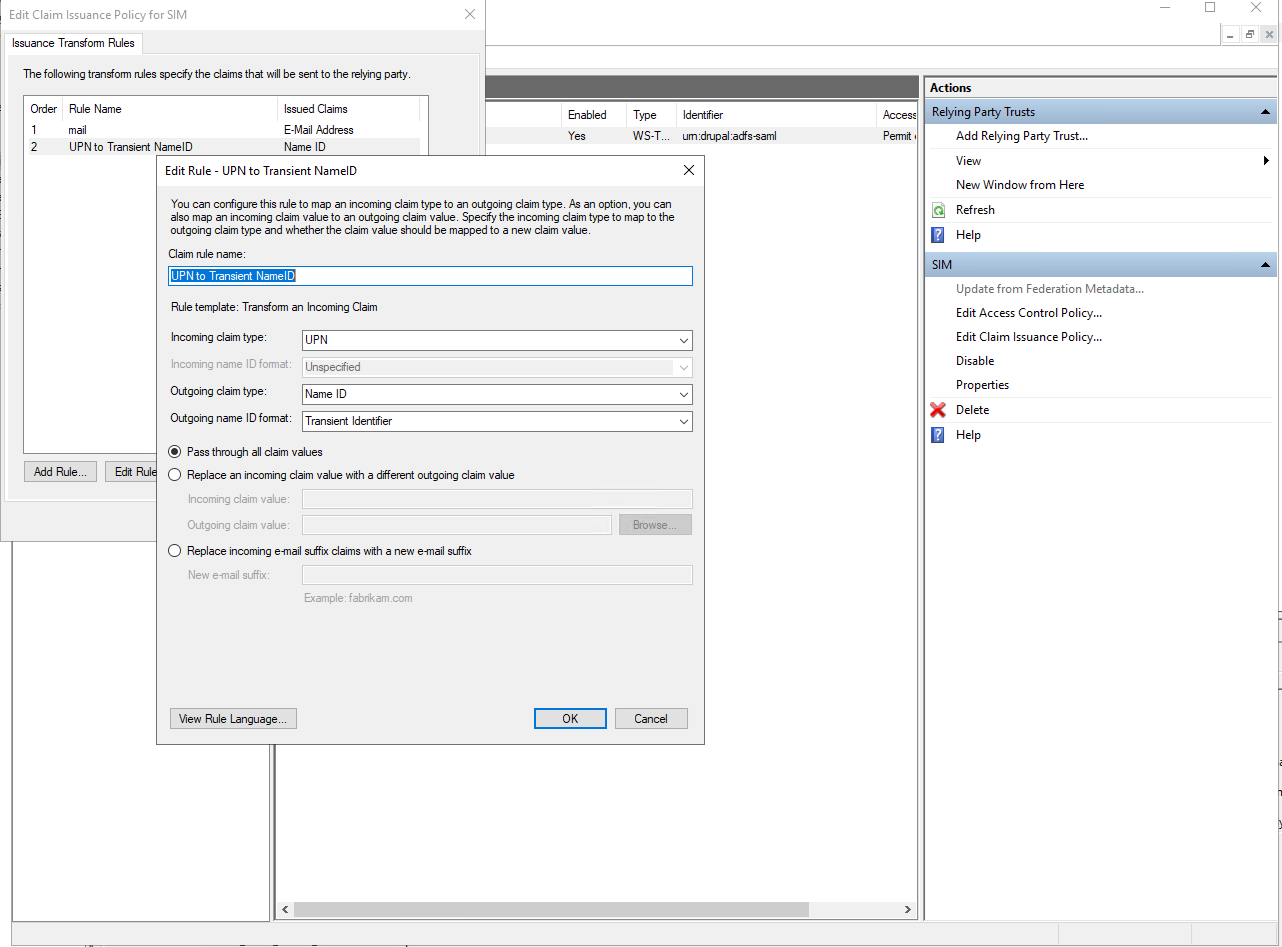
Configure a transient Name ID
Open Social expects a transient Name ID. This is a security matter to ensure that login details for Open Social can not accidentally be used for other systems linked to the ADFS server.
- Click "Relying Party Trusts"
- Select the Relying Party created for Open Social
- Click "Edit Claim Issuance Policy"
- Click "Add rule"
- Choose "Transform an incoming claim"
- Click "Next"
- Call the rule "UPN to Transient Name ID"
- For "Incoming claim type" choose "UPN"
- For "Outgoing claim type" choose "Name ID"
- For "Outgoing name ID format" choose "Transient Identifier"
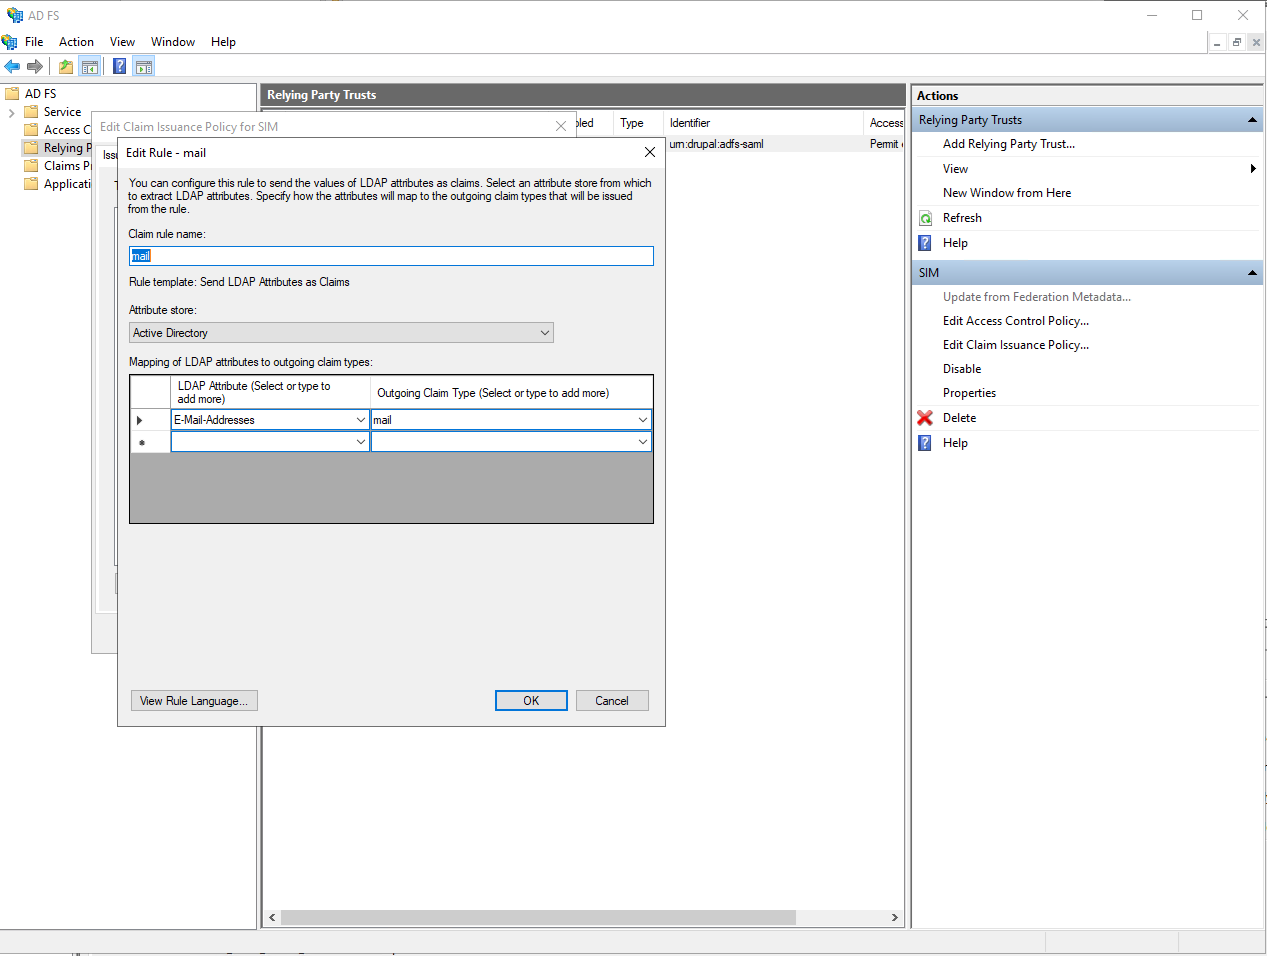
Configure the Mail attribute
Open Social requires a mail attribute which is an alternative name for the default "E-mail-address":
- Click "Relying Party Trusts"
- Select the Relying Party created for Open Social
- Click "Edit Claim Issuance Policy"
- Click "Add rule"
- Choose "Send LDAP Attributes as claims"
- Click "Next"
- Call the rule "Mail"
- Select the attribute store "Active Directory"
- Select the LDAP attribute "E-mail Addresses"
- If your organization uses a non-standard field to store user e-mail addresses, select that instead.
- Choose the outgoing claim type "mail" (this is not a standard attribute and must be typed manually).
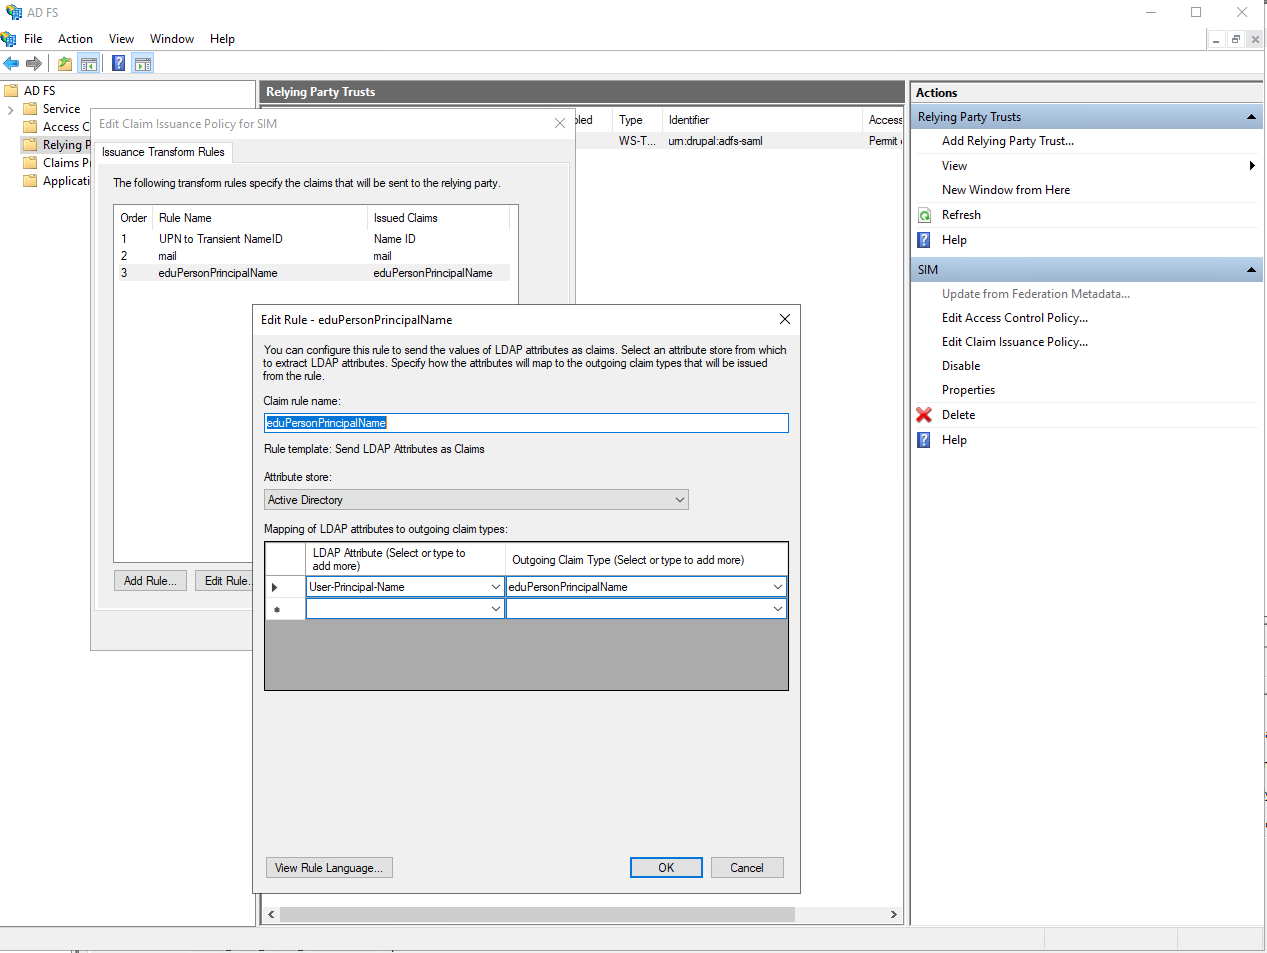
Configure the eduPersonPrincipalName attribute
Open Social requires an eduPersonPrincipalName attribute which is used to link the Open Social user to the ADFS Identity Provider and will be adopted as username for the Open Social user.
- Click "Relying Party Trusts"
- Select the Relying Party created for Open Social
- Click "Edit Claim Issuance Policy"
- Click "Add rule"
- Choose "Send LDAP Attributes as claims"
- Click "Next"
- Call the rule "eduPersonPrincipalName"
- Select the attribute store "Active Directory"
- Select the LDAP attribute "User-Principal-Name"
- If your User-Principal-Name is an e-mail, you must choose a different LDAP attribute to use for the eduPersonPrincipalName as Open Social does not support using e-mail addresses for usernames.
Pick an attribute that is unique across the users that will be using Open Social and does not change over their lifetime. The value chosen for this attribute may be visible to users on the Open Social platform.
- If your User-Principal-Name is an e-mail, you must choose a different LDAP attribute to use for the eduPersonPrincipalName as Open Social does not support using e-mail addresses for usernames.
- Choose the outgoing claim type "eduPersonPrincipalName" (this may not be a standard attribute and may have to be typed manually).
Configuring Google for Organizations for use with Open Social SimpleSAML
On your Google admin dashboard go to "Apps" and then continue to "SAML-Apps". Create a new app and click "Configure Custom App" when asked what service/app you wish to enable SSO for.
Make note of the Entity-ID and download the Idp-metadata. You will need these when adding the Identity Provider to Open Social. Then click next.
Add a name for your application and alternatively add a logo and description. These may be shown to users trying to authenticate with Open Social for the first time. Then click next.
On your Open Social platform, from the settings page, find the ACS-URL and Entity ID that you need. Fill these in on the "Data of serviceprovider" screen. Make sure that you set Notation name-ID to "TRANSIENT". Then click next.
Use this screen to set up the attributes that should be used for the Open Social username and e-mail.
Finally click "Finish"
Enabling your Identity Provider for users
Depending on your organization's settings, by default your new Identity Provider may not be enabled for any user. Leading to a 403 error when trying to access the Identity Provider.
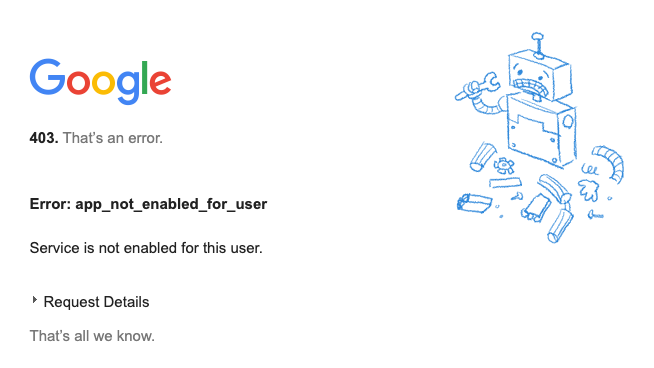
You will need to edit your service and either enable it for everyone or add groups and/or organizational units that are allowed to use the service.
Troubleshooting
Below we have included some troubleshooting information that can help you in configuring your Identity Provider to play well with Open Social. If you're encountering a problem that's not yet listed, please contact your Open Social support provider. If you solve a problem that's not yet listed, please also let us know so we can improve our documentation for others.
Testing the response sent by the Identity Provider
Use the "Debug Login URL" from the Open Social SAML settings screen on your Open Social platform to test the configuration of your identity provider.
When you've correctly configured an enabled identity provider, this will redirect you to your Single Sign-On portal and bring you back to a debug screen that shows you the attributes sent from the Identity Provider to Open Social.
If you've made changes in your configuration and find that they are not being reflected on this page, then it could be that you're viewing an older session. Try an incognito window and make sure you've closed all incognito windows to ensure your session is terminated before starting a new one. Also check that the configuration changes on the Identity Provider have been properly persisted and that necessary services have been restarted to put the new configuration into effect.
I receive an internal server error page when I'm being redirected back to Open Social from the single sign-on portal
Make sure the attributes sent from the Identity Provider back to Open Social are configured correctly. Check the spelling of the attributes and ensure that data is actually sent as attributes and not in some other manner. See "Testing the response sent by the Identity Provider" for help with viewing the data sent from the Identity Provider.
I receive an error report page when I'm being redirected back to Open Social from the single sign-on portal
This usually indicates a misconfiguration on the Open Social side. Please be sure to submit your error report so Open Social developers are notified of the issue. The submitted error report contains information helpful in determining the issue.
I receive an error in ADFS during a federation passive request
Open Social requires a Name ID, which is a UPN. However, if you provide a 'normal' UPN you will get the error message shown below in your ADFS event log.
This error message indicates that Open Social expects a transient Name ID. This is a security matter to ensure that login details for Open Social can not accidentally be used for other systems linked to the ADFS server.
See the instructions for Configuring ADFS for use with Open Social SimpleSAML - Configure a transient Name ID on how to correctly configure your ADFS service.
Encountered error during federation passive request.

Additional Data

Protocol Name:  Saml
Relying Party: urn:drupal:adfs-saml

Exception details:
Microsoft.IdentityServer.Protocols.Saml.InvalidNameIdPolicyException: MSIS7070: The SAML request contained a NameIDPolicy that was not satisfied by the issued token. Requested NameIDPolicy: AllowCreate: True Format: urn:oasis:names:tc:SAML:2.0:nameid-format:transient SPNameQualifier: . Actual NameID properties: Format: , NameQualifier:  SPNameQualifier: , SPProvidedId: .
  at Microsoft.IdentityServer.Web.Protocols.Saml.SamlProtocolManager.Issue(HttpSamlRequestMessage httpSamlRequestMessage, SecurityTokenElement onBehalfOf, String sessionState, String relayState, String& newSamlSession, String& samlpAuthenticationProvider, Boolean isUrlTranslationNeeded, WrappedHttpListenerContext context, Boolean isKmsiRequested)
  at Microsoft.IdentityServer.Web.Protocols.Saml.SamlProtocolHandler.RequestBearerToken(WrappedHttpListenerContext context, HttpSamlRequestMessage httpSamlRequest, SecurityTokenElement onBehalfOf, String relyingPartyIdentifier, Boolean isKmsiRequested, Boolean isApplicationProxyTokenRequired, String& samlpSessionState, String& samlpAuthenticationProvider)
  at Microsoft.IdentityServer.Web.Protocols.Saml.SamlProtocolHandler.BuildSignInResponseCoreWithSerializedToken(HttpSamlRequestMessage httpSamlRequest, WrappedHttpListenerContext context, String relyingPartyIdentifier, SecurityTokenElement signOnTokenElement, Boolean isKmsiRequested, Boolean isApplicationProxyTokenRequired)
  at Microsoft.IdentityServer.Web.Protocols.Saml.SamlProtocolHandler.BuildSignInResponseCoreWithSecurityToken(SamlSignInContext context, SecurityToken securityToken, SecurityToken deviceSecurityToken)
  at Microsoft.IdentityServer.Web.Protocols.Saml.SamlProtocolHandler.Process(ProtocolContext context)
  at Microsoft.IdentityServer.Web.PassiveProtocolListener.ProcessProtocolRequest(ProtocolContext protocolContext, PassiveProtocolHandler protocolHandler)
  at Microsoft.IdentityServer.Web.PassiveProtocolListener.OnGetContext(WrappedHttpListenerContext context)
For more information, contact your Open Social Support Contact.